


 958 / 1034

HVAC
45
CLOSED DOOR TEST
TEST DURATION: 10 min.
INITIAL VEHICLE CONDITIONS
The following conditions to be confirmed before start-
ing the test:
Vehicle stationary with all doors closed
Engine Speed
1500 rpm
FOR MANUAL HVAC
Front Blower Speed
4
th
AC Switch
ON
Temperature Knob
Max. Cool
Vent Knob
Chest
Air Intake
Recirculation air mode
Run the vehicle in the above condition with all doors
closed for 10 min. At the end of 10 min insert the
probe at the front vent and record the readings simi-
larly insert the probe at the rear vent and record the
reading.
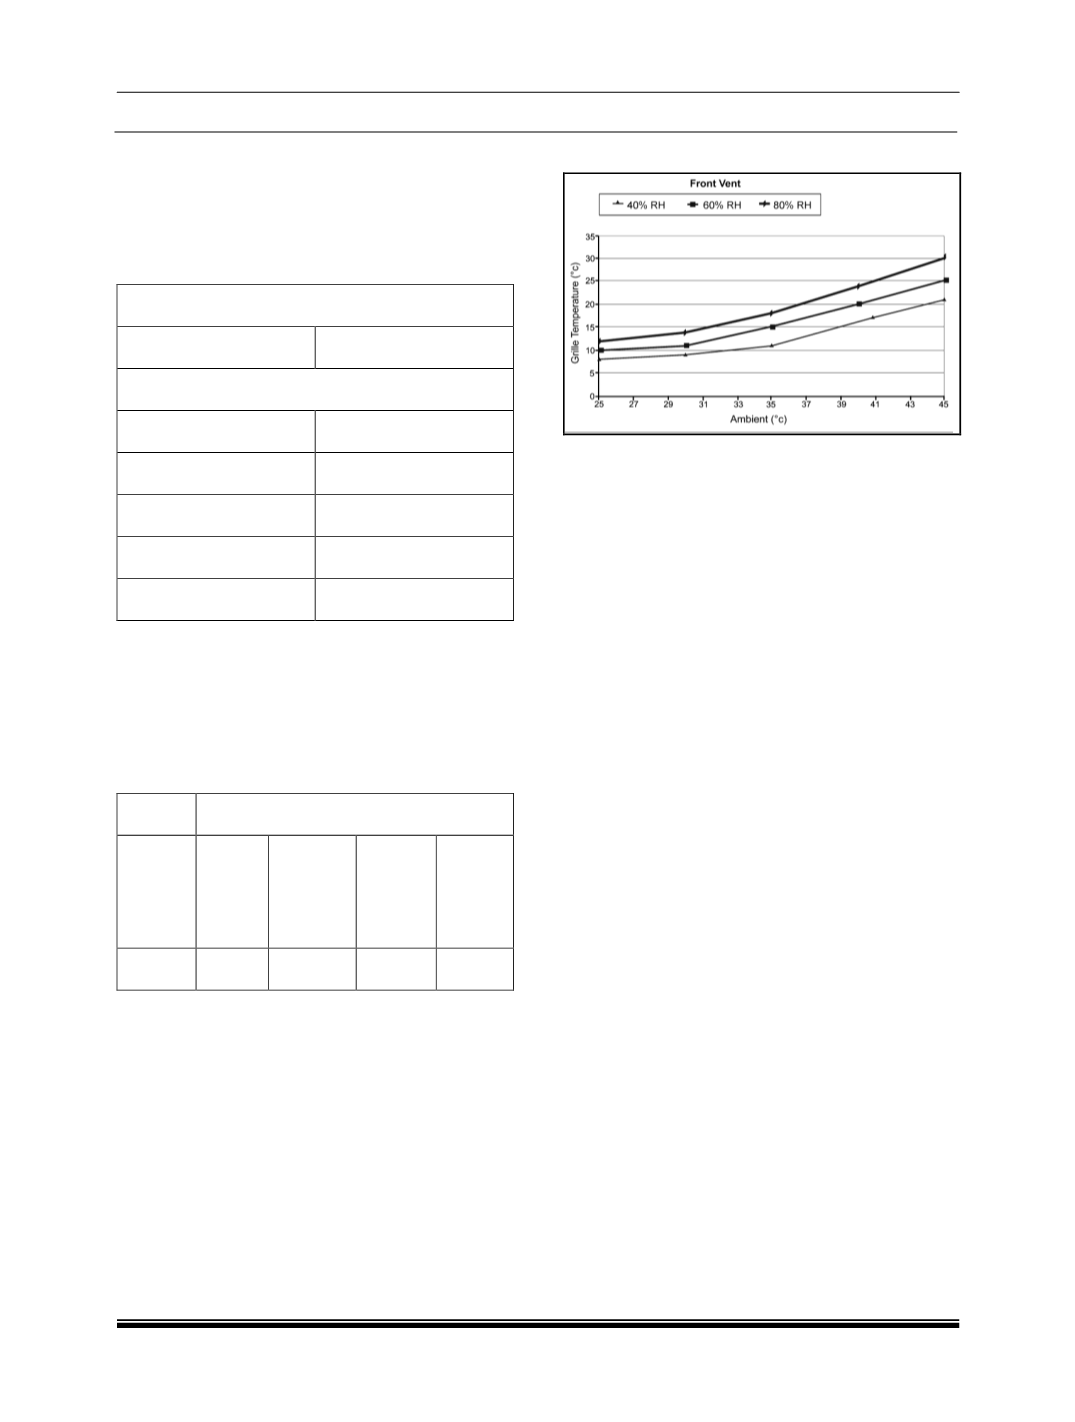
The reading of front vents should be as per the table
given below:
VENT
AMBIENT TEMPERATURE
< 30ºC
(RH up
to
40%)
30–35ºC
(RH up
to 40%)
35-40ºC
(RH up
to 40%)
Above
40 º C
(RH up
to 40%)
FRONT
9 C
10 C
17 º C
21º C
RH:
Relative Humidity.
NOTE
The above table is applicable if the ambient RH
is 40%.
For RH higher than 40% refer the graph below
for acceptable temperatures:
FRONT VENT
B. LEAK DETECTION
a. Visual Detection:
Look out for oil leaking from
joints, as compressor oil is mixed with refrigerant it
also circulates along with it, hence it might also leak
at the joints. If leakage is found rectify, if not proceed
with any of the test mentioned below to confirm
leakage.
b. Ultra fluorescent Leak Detector:
The
compressor oil used is pre-mixed with a fluorescent
dye. Using a specially designed UV lamp inspect the
components. If there is a leakage the coloured dye
glows bright. This test can pin point small leakages.
c. Electronic Leak Detector:
This test is done using
an electronic leak detector
1. Place the vehicle in a well ventilated area, free
from wind, as leakage can be dissipated without
detection in a windy area.
2. Follow the instructions issued by the
manufacturer of the particular leak detector being
used.
3. Commence searching for leaks by passing the
detector probe around all joints and components.
NOTE
Refrigerant gas is heavier than air.
4. Insert the probe into an air outlet of the
evaporator or into the evaporator drain tube.
5. Switch the air conditioning blower on and off at
intervals of ten seconds. Any leaking refrigerant
will be gathered in by the blower and detected.
6. Insert the probe between the magnetic clutch and
compressor to check the shaft seal for leaks.
7. Check all service valve connections.
8. Check the condenser for leaks at the pipe unions.
9. If any leaks are found, the system must be
discharged before rectification.